Tag Archives: wohnung

Swiss Wardrobe Quotation (Eeek!)

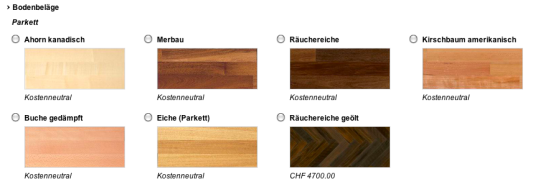
Whelp, after I sketched up those wardrobe ideas, we received the offers from Dogern. They are so professional they also give you some simple renderings, which easily impresses me.

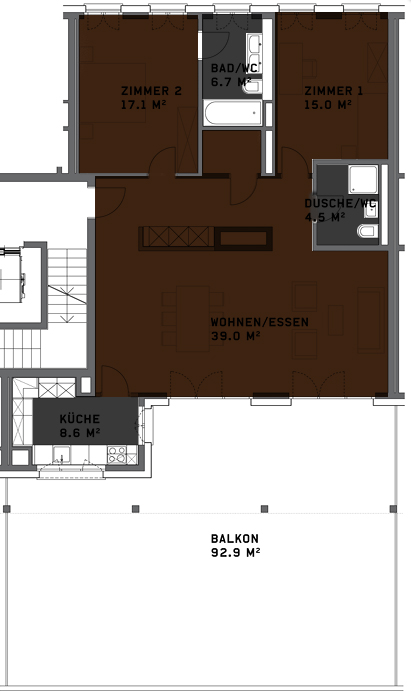
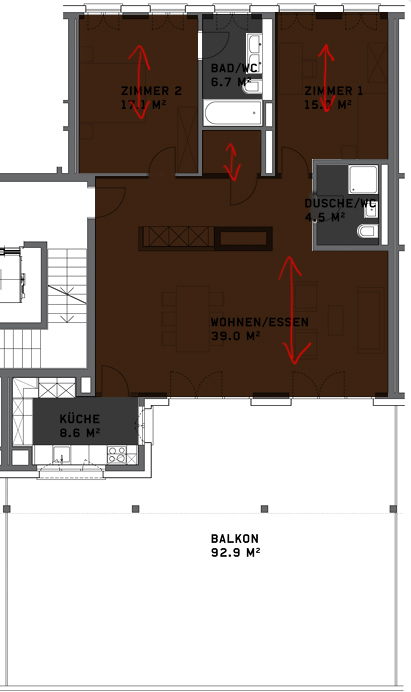
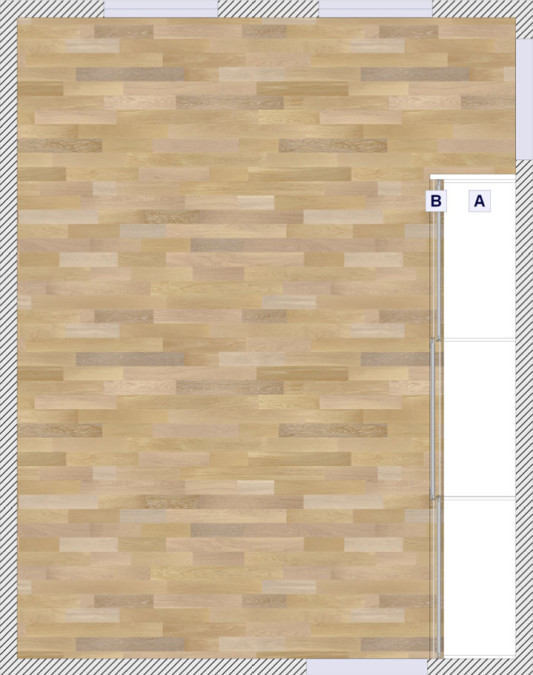
If you’ve forgotten, here is our bedroom floor plan. Our floor is darker of course. Two windows on the top wall, the bathroom door on the upper right wall and the door to the rest of the flat on the bottom wall.

We plan to make just one wardrobe now and possibly (depending on cost) supplement with a dresser or two on the other walls.

Frameless Doors:

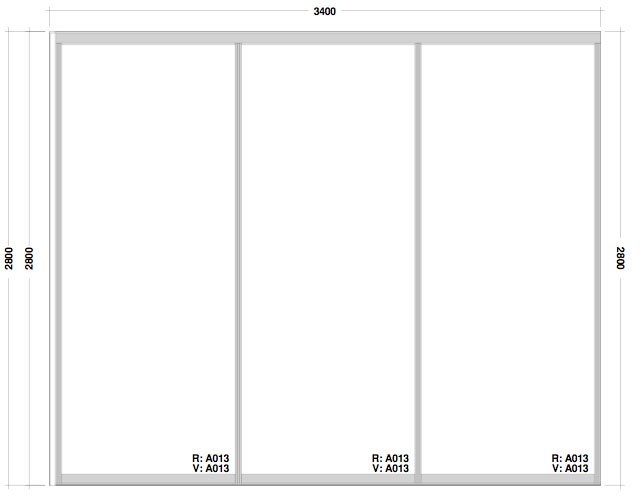
These Noteborn doors are so nice. The frameless adds a very elegant touch and makes the whole wardrobe blend seamlessly into the wall. They are our favourites, but we weren’t looking forward to finding out the price.

Matrix Doors:

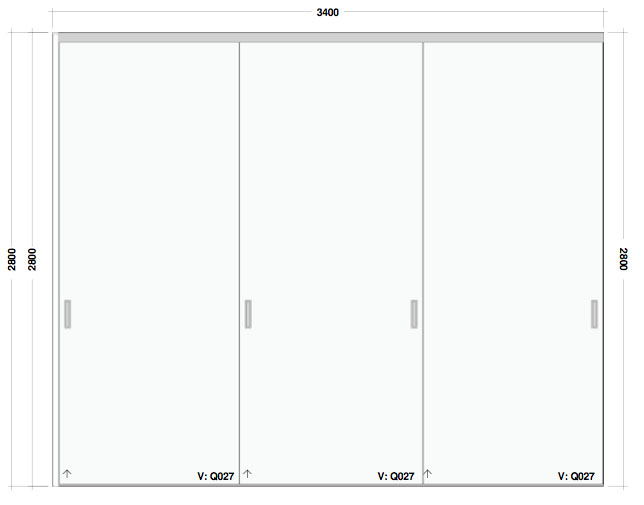
The Matrix doors are a little more clunky and have a frame running around each individual door, so if we choose white doors to match the walls, the doors will be broken up by the lines of the frames in each section.

Option 1:

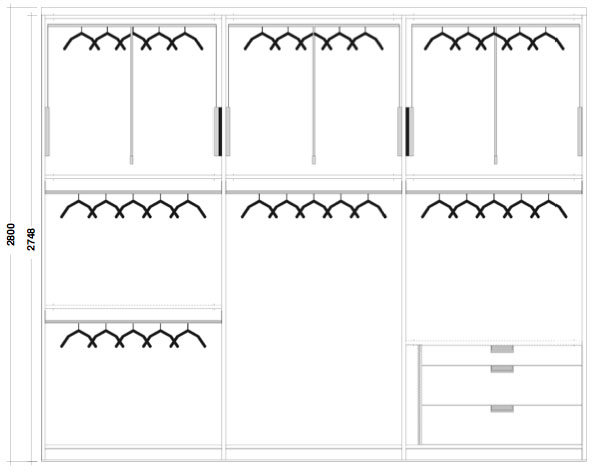
The idea of option one is to save money on those expensive, expensive drawers and just go for hanging space and using drawers where we can’t fit any more space. The reason why I haven’t made it completely hanging space is that Kay’s clothes (shirts and pants) are all fairly longer than mine, so on his side (on the right) it’s not quite long enough for three rows of shirts and pants to fit. On my side (the left) I think I can squeeze one more row in for maximum capacity!

Option 2:

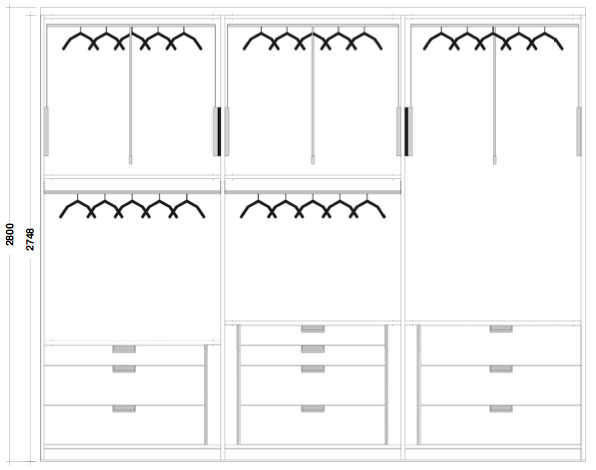
On this version we stick drawers in each section. It cuts down on the hanging space but in general should be as much or more space than we had with our old wardrobes in Zürich. And we have lots of drawer space for pullovers and pants and things.

Again I made Kay’s section (this time on the left) have more space for larger/longer clothes and on my side (this time in the middle) I put extra drawers in.

Prices:

  • Option 1 with Matrix doors: 7225CHF ($7871)
  • Option 1 with Frameless doors: 9458CHF ($10,304)
  • Option 2 with Matrix doors: 10049CHF ($10,948)
  • Option 2 with Frameless doors: 12420 ($13,523)

Yes, yes those are some crazy prices. But I’m afraid we’ve looked at almost every custom wardrobe place along the border in Germany and in Switzerland and this is way cheaper than a lot of other offers out there. It would have cost 20,000 or so to do two wardrobes, which is why we are either doing one or supplementing with dressers.

It costs an extra 2300CHF ($2500) or so to get the frameless doors, so as much as we love them… no. I just can’t. Not for a non-forever home at this point in our lives. It would add to the value of the house, but we really don’t have the money right now and I don’t want to live most of the time here with nothing just so we can get something nice for a year or two before we leave. That’s not smart!

As for the price difference between having tons of drawers or going for the supplemental dresser route, we are debating whether it’s worth it to save 2824CHF ($3076) and use some of that money to buy a dresser or two and have more storage. We would just need to find some dressers we like, which isn’t so easy in Switzerland!

Were you ever surprised how expensive it is to do something custom in your house?

Organizing the Flat

Boy does it take awhile to get settled in a new place!

I think it usually helps if you actually own all the furniture you have before you move (we need to buy a lot of storage shelving and wardrobes) and you know, if your bathroom isn’t rendered inhabitable right after you move in. Still, somewhere between holding up all those awnings (God, my arms!!) I managed to start unpacking.

Since we finished moving earlier than planned, we went ahead and bought two super  tall bookshelves to start organizing our office. The rooms are so tall that we can actually fit two additional shelves on top of the highest Billy model, making the bookshelves about 280cm or 9’18” tall.

Thank goodness I still had all my plastic bins from our built-in-bookshelves in Zürich!

We also had that orange sofa bed up there delivered fairly soon after moving in, but the guy was totally weird and gave us a sofa with the wrong feet, so it didn’t sit properly on the ground. And it was pretty gross so I wanted to strip the covers and wash them pronto, but it took a good week before the room was clear enough to take the cover off.

Down in the basement, we had this:

It honestly doesn’t look much better now because we still don’t have shelves down there, but we threw away the broken bed frame and some boxes and Styrofoam, so that helped a little. Kay will get his bike out of there as soon as he finds his bike lock and stores it in the bike room in the garage.

By the entrance to the cellar is our little wash area with a laundry tower on one side and a sink on the other side.

The cellar is a decent enough size, definitely bigger than what we had in Zürich, and since it’s tall we will eventually be able to utilize shelving to clear everything up, but for now it’s a little chaotic.

We also bought that dehumidifier you see because we spotted a little dampness on our back wall during inspection and we don’t want any mold problems. The building is still so new that the concrete walls are quite moist, so we will leave the dehumidifier on for quite awhile. In fact, before we bought the hose for it to drain directly, we had to empty the 20L container every morning and evening. Without it, it’s roughly 70% humidity down there… and with the dehumidifier it’s keeping it around 45%. Maybe that’s keeping it a bit dry for summer months, but since the walls keep oozing out humidity, we just want to soak that up before problems start.

The home inspector also recommended keeping our things away from the walls for quite awhile. (I forget how long of course) so when we get shelves, we’ll probably set them up in the middle of the room to start with.

Now, here are those weird stubby legs that came with the sofa bed. They are not from the Karlstad series and when attached to the sofa bed, the sofa just sat on the sofa bed parts and not the legs. It was pretty random. We pulled them off and stuck them on our normal 3 seater Karlstad until we buy metal legs for the living room sofas.

The sofa is also noticeably shorter with these legs, but at least with the old square legs we could set the sofa bed on its feet and start taking the covers off to be washed.

So that’s what’s going on with the house at the moment. Baby steps as we acquire more storage room. Our flat in Zürich sure did have a lot built in with the laundry room and the attic storage!

Homeowners!

It’s been a crazy couple weeks as the internet was cut, we moved and waiting to get back online at the new place. Oh how I missed internet! Sweet, sweet internet.

On the Friday of our move we got up at 6:45am to get to the notary office by 8am sharp. Our appointment (all in Swiss German, yikes!) didn’t last long. We were given some papers to read over and sign and then the deed was officially, legally passed over.

After we were done at the notary we popped into the Gemeindehaus to register because we had de-registered in Zürich the day before. (You must register where you live with the authorities at all times, no gaps!) Kay paid 20CHF for us to re-register and 45CHF went to the Bundesamt für Migration (immigration) simply because I am a foreigner. 😉

I asked if I could complete my new Ausländerausweis at the same time because we married in the summer so every July/August I have to do it. But I forgot that I have to get the stupid form signed by my employer, despite the fact that my permit is supplied directly through my Swiss spouse. Argh. That means another trip to the Gemeindehaus for me! (I joked to Kay that I should be a house wife so my forms are easier to fill out!) When I returned to the Gemeindehaus with my signed permit form, I paid an additional 102CHF for my annual foreign residence permit, putting my fees 147CHF over a normal person like Kay’s. Le sigh.

Back at the flat we completed our inspection and things looked… surprisingly OK. The grout job in the bathroom was still not as good as if they had done it correctly the first time, but to be honest, I’m pretty anal about the small details. But I’ll get into that later… with our keys in hand, we were finally home owners!!

Up next, the move!

Neubau Progress: Walls, Woodwork and Everything Else

Maybe I glossed over it in previous posts, but throughout the bathroom and kitchen upgrades, we were thinking about the overall look of the house the whole time.

The contractor gave us several cost neutral “free” choices and from there we could choose if we wanted to upgrade to a different material for our floors, kitchen cabinets, bathroom tiles, etc. It would be very easy to sink several thousand francs into upgrades, so we really tried to stick to materials included in our base price.

In fact, I was sure that from the granite to choose from below, we would go with Shiva Black because it was free and what we wanted (black), however, when we went to the kitchen store to view the granite in person, Shiva Black just looked… well, boring. We opted to upgrade to Nero Marcus (maybe not the version below) that had a much better texture and glints of texture that caught your eye in the sunlight.

For kitchen cabinets we really kept it simple because not only would it cost a lot to upgrade all of them, but Kay hates cleaning our current super shiny “glanz” cabinets because they show every fingerprint. So for this we stuck to basic, Swiss white.

In the bathrooms and kitchen we would have tile and since, again, we did not want to spend a few thousand upgrading to complete black, we opted for the proCasa 342a below, which is a darker grey in reality. We figured that in the kitchen especially, having dark countertops and floors would be balanced by the white cabinets.

When I first saw the parquet options I knew that Kay would want “Eiche” and I would want “Räuchereiche” or “smoked oak”. But I didn’t think Kay would ever agree to such a dark wood, so I thought maybe we could settle in the middle with Merbau. Sure enough… his first suggestion was the Eiche, or oak.

I was pretty set on Merbau until we actually saw it in real life. It was not nearly pretty as below. It was a cheap-looking wood with many dark spots and specs that I did not care for. Surprisingly, both of us agreed that our very favorite wood was the oiled smoked oak, which is available below in a fishbone pattern.

When we actually went to the flooring business they told us that for less money, we could have the oiled smoked oak without the fishbone, which Kay is not particularly a fan of. He thinks it is too old fashioned, so I agreed we should get normal grain wood.

The salesman explained the difference between laminated wood and oiled wood and we were pretty sold on the oiled wood. It’s more natural, easier to buff out scratches and you can re-oil and re-stain it over the years as it lightens. To be honest, all of the laminated cost-neutral options seemed kind of lame once we learned the benefits of oiled wood.

Above is our bathroom cabinets veneer with the wood. They’ll never be in the same room, but they are more or less in line with each other. The planks of wood will also be this width throughout the apartment.

Below is the plan showing where the wood flooring will be installed and where the tiles will be installed. At first when we received our plan, they left the wood out of the pantry in the middle, so it was important to check that they put it everywhere they should!

With the flooring salesman we also discussed which direction the wooden planks will travel in. We thought it would make more sense for them to travel down the length of the living room, longwise, but the guy explained that wood flooring looks much better when the light coming through the windows travels down the wooden plank, so we set up the wood to travel that direction in all the rooms.

Again, when Kay had the meeting with the tile guys he had them set up the direction of the tile in the same way as the wood flooring to match.

Our flooring choices are a bit dark, but with all the white on the walls and cabinets I think it will be a nice balance. Next we can decide if we really want to do a black/red/white theme like we did for our wedding or if we want to branch into other colors like teal, green, etc… Maybe some mood boards are in our future.

Lastly, when we decided everything for the bathroom we actually had to pick out a sink for the cellar washing area and decide if we wanted to spend a ridiculous amount on the drying system below. The answer is “no”. But we are “splurging” (or being swindled, based on how you view it) for the garage storage box because I think that will be important for anyone who has a car in our parking spot down the road.

So, that’s that. Besides worrying about my toilet paper holder, I think almost all of the flat decisions have been made at this point.

Want to catch up?

Neubau Progress: VII

I was really worried that after January, we wouldn’t be able to see our flat again until it finished in May, but in February, Kay visited the flat for an appointment with the tile guys in the bathroom.

He noticed that in addition to the big hole we found in the kitchen, they had also drilled further into the hole outside the kitchen door. Not impressed.

Kay met with the tile guys and told them which direction we wanted the tiles to go. We also decided that since they fit perfectly on the ledge, we would use the black floor tiles on the bathroom ledge above the sink as well.

Kay sent me pictures of how the tiles would be direction-wise and he explained to me that they would be setup subway style as opposed to straight grid lines.

Kay also asked me on the phone if I was really sure I wanted white grouting on the walls, because it would cost more. Yep. I want white, white, white so I can see any dirt or grout on my bathroom walls. I think we can spare the minimal cost of upgrading here.

We also specified that we wanted the darkest grout available for the floor to match the floor tiles. My mother always had a hard time keeping the light grout in her kitchen tiles clean so I definitely didn’t want that to be an issue for us.

The rest of the flat was still kind of a crazy mess. Since they drilled the utility shaft so late, everything was a bit behind in the kitchen installation. We were also exchanging our steamer to upgrade some more, at a special, extra additional cost on us… but whatever. I was going to get my temperature controls!

Kay also snapped a photo of our curtain rails.

Small details like this are something that the company sort of glossed over, but I would wake up in the middle of the night and wonder if we have to pay to install something ourselves or if it comes standard with the flat. I was happy to see them installed.

As you can see, they are the standard double curtain rail in Switzerland. We don’t normally have fancy curtain rods, but instead these minimalistic flush curtain rails with a track for sheer privacy curtains and another for heavier blackout curtains.

Our fuse box was still a hot mess.

Here they’d already marked on the floor which direction the tiles would be laid.

And since he was there, Kay went down to the floor below ours and checked our our kitchen hole from below.

Argh, just what are they doing in the kitchen?

I think this is the flat below ours where you can see they unfortunately had already installed the kitchen cabinets when they realized they’d forgotten the utility shaft.

Well well, no point stressing when there’s nothing we can do. We just had to wait and hope they patch it all up correctly… At least our tiles will be the right color and grouting after asking three times and going to this appointment!

Want to catch up?